

How To Photograph Artwork With Digital Camera
Practice you take paintings at home that you'd like to share online? Yous'd be surprised, but photographing artwork can be quite challenging.
Don't worry. We have a few tips to assistance you capture masterpieces with professional results.
 [Note: ExpertPhotography is supported past readers. Product links on ExpertPhotography are referral links. If you use ane of these and purchase something, we make a little flake of money. Need more info? Encounter how it all works here.]


Best Camera for Photographing Fine art
Some galleries and museum might utilise high-quality digitalising techniques using digital medium format cameras. Although well-nigh people won't need this equipment.
A digital SLR or mirrorless camera is the ultimate choice for photographing prints.
Compact cameras with manual controls are also useful.
If yous don't have a DSLR, a high-end smartphone can do the chore if big file sizes and detailed images are not required. But it would help if yous utilise a third-political party app that allows yous to set manual adjustments to get the all-time results.
Camera Settings
Settings are crucial to achieving the highest quality if yous want to photograph art. Hither are some of the adjustments you need to change before you printing the shutter.
Utilise Low ISO to Minimise Paradigm Noise
To achieve the cleanest look, plow off your Machine ISO Setting. So pick the everyman ISO, which is usually 100.
A higher setting like 1600 is excellent for shooting in dim lighting but will give grainy results. That'due south not suitable for reproducing artwork. Especially because colour accuracy and sharpness matters a lot!
Switch to Narrow Discontinuity for Sharp Results
We know that using a wide discontinuity such as f/1.two or f/1.4 creates a shallow depth of field. It's not much of an upshot when photographing pictures since the canvas is apartment.
Nonetheless, it would yet be ideal to choose a narrow aperture such equally f/11 or f/16. That mode, you can ensure that even the well-nigh minute details stay sharp.
To guarantee your discontinuity value doesn't change, select Aperture Priority.
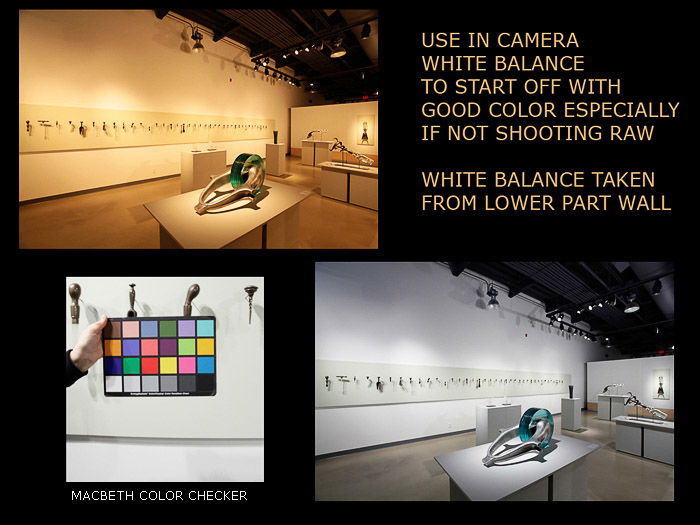
Use White Residue and Colour Management for Authentic Representation
Most digital cameras take a white remainder control (WB) on the camera trunk or within its menu. The user can select settings from cloudy to sunny and flash to tungsten. They even have the option to choose auto or custom to match the scene's lighting.
Many variables affect color balance in every footstep of the process.
Using custom WB while shooting is an like shooting fish in a barrel first pace to manage image colour.
A Color Checker is a handy tool for managing colour if you are looking for an even more authentic issue. Information technology has panels of diverse colours which you lot tin can utilize as a reference to correct your WB.
Yous should also calibrate your monitor. Check your monitor's colour quality, contrast, and brightness for free on this site.
These steps are quite crucial to truly stand for the qualities of an artwork.
Lighting for Artwork Photography
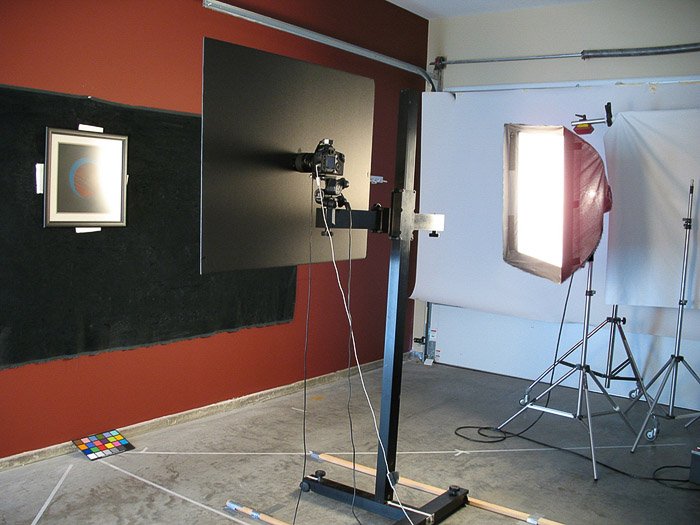
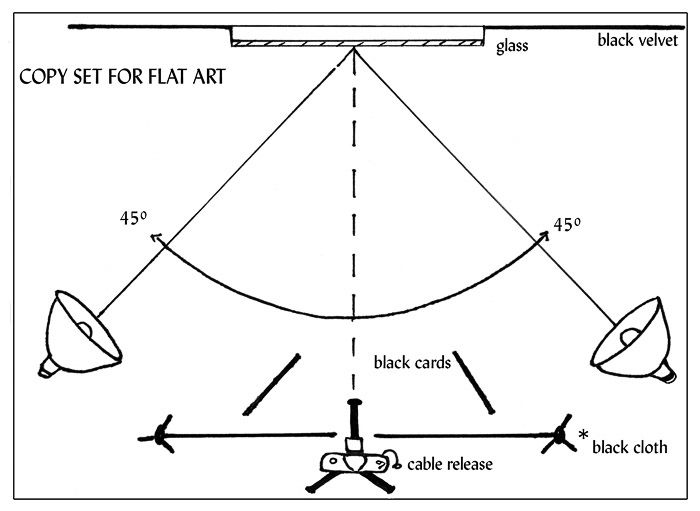
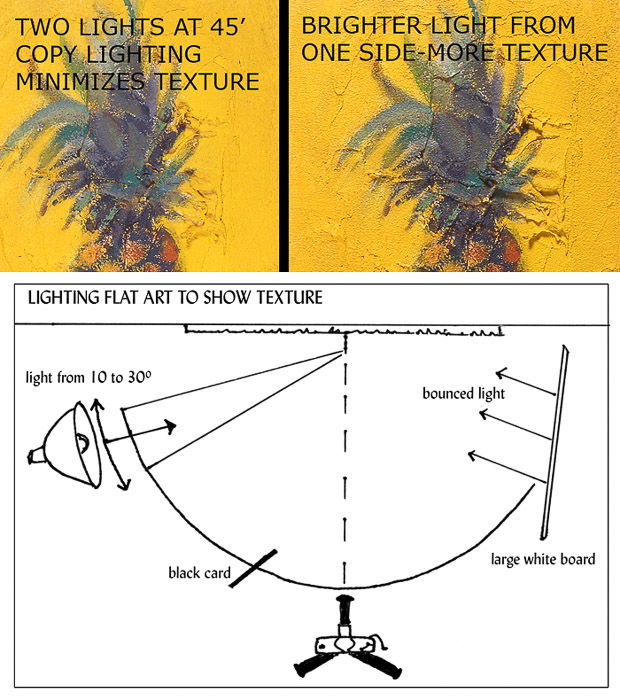
The standard lighting setup for photographing apartment fine art uses two identical lights. You tin position them at 45° to each side in front of the painting.
These two lights need to match in wattage or output and be the aforementioned distance from the centre of the artwork.
This lighting method provides an even launder of shadow-less low-cal. One light cancels out the shadows cast past the other light.
A setup like this requires quite a large room to get the lights far away from the artwork. If they are too close, y'all might see glare on the edges of your painting. Try moving the lights further apart to reduce glare or use a longer focal length lens (80 – 100 mm). This puts the camera further from the subject and helps to eliminate glare.
Yous can bounce lights off neutral side walls or massive pieces of white cream core. Or you lot tin lengthened them through white textile for a softer look and reduce glare.
What if your artwork is backside glass? You lot tin can eliminate reflections past using black foam cadre in forepart of the photographic camera lens.
Try not to mix your lighting sources. If shooting indoors with artificial lights, block off the windows. If using natural window light, turn off any room lights.
Using bogus lighting offers consistent results. Besides, information technology is easier to adjust the white residual later. Natural low-cal, however, is continuously irresolute in quality, brightness, and colour temperature.
Nonetheless, many artists go corking results in photographing their piece of work using natural light. This method works best indoors in a bright room with windows and neutral coloured walls. Apart from that, you lot should also have plenty space to fix up a tripod several anxiety back from the artwork.
How to Photo Artwork
Prepare the Scene Before the Shoot
Get-go by hanging your art on a neutral-coloured wall. White, greyness, or black often works. On the other manus, shooting in a room with bright coloured walls tin can skew the colour balance of your photograph.
Positioning the art in a vertical orientation makes it easier to take evenly balanced lighting across the work, especially if your master source is coming from one side.
You can then rotate your photo in post-product to achieve the right orientation.
If the work has a framing wire, hang information technology at a comfy height and cheque that it is flat against the wall. If necessary, use spacers fabricated of cardboard or cream core behind each corner. That way, the artwork hangs parallel to the wall.
Utilize a level to check that your art is vertical. Then gear up your photographic camera, then it's lens height matches the centre of the artwork. Go a measuring tape to keep everything straight, don't eyeball it.
A sturdy tripod is essential for precipitous photos and accurate squaring up of the artwork. Use a cable release, mirror lock-up, or the cocky-timer to eliminate all photographic camera movement.
Cheque the level on your camera screen again to see if information technology's too parallel to the shooting wall. When both the camera back and artwork are parallel to each other, the perspective should exist shut to correct. Distortion will likewise exist minimal.
Get as close equally possible, leaving only a small amount of space around the edges of your artwork. You can crop this out later.
You tin can agree prints in place by attaching a large thin canvas of metal to your wall. Then use small earth magnets on the corners of the photograph. Remove the world magnets later in mail-processing.
Y'all could also lean them up on a strong board slanted confronting the wall then parallel the camera back to this lath. This method works if the prints are even so size. If size varies a lot, then it is much easier to square up the work keeping everything is in a vertical plane.
Consider Direction equally Well as Quality of Light
Are you using window lite every bit your primary source? Then position a large white piece of foam core on the opposite side of the window beside the painting. Doing and so bounces some of the window light back to residuum out the darker side of the piece of work.
You can control the texture by varying the distance of the whiteboard from the piece of work. Or you tin can besides adjust the range of your work to the window.
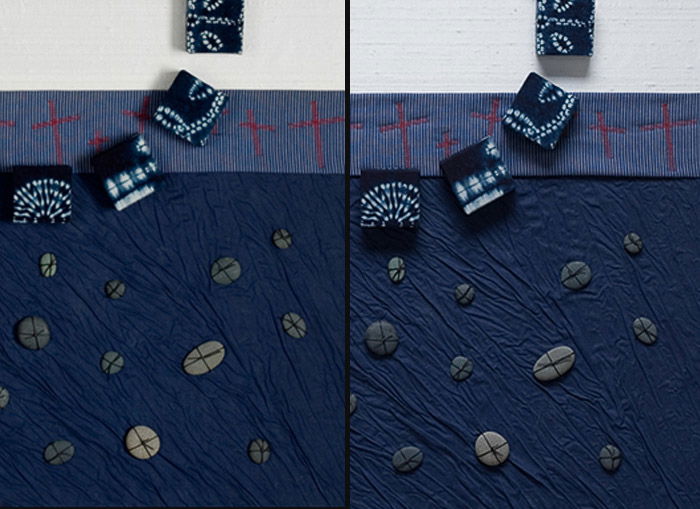
Check out the diagram and samples below for a lighting setup to bear witness more texture in a painting. Notice where the shadows in the image on the right are falling. Doing so tells yous where the calorie-free is coming from (in this case, the tiptop).
I rotated the painting on its side, and the stronger lighting came from the left side. In mail service, I then switched the image dorsum to the correct orientation.
I think that the shadows wait most natural on this field of study if lighting appears to come from above.
Use a Grey Bill of fare to Capture Colours Accurately
Including a white or grey carte du jour in 1 of your photos gives you a known reference point. You can utilise this in your image editor to clean up any color cast present.
If yous employ an 'eyedropper' to read diverse tones in your photograph editor, the neutral colours volition have equal RGB numerical readouts. For example, pure white is 255 255 255; neutral mid greyness is nigh 120 120 120 while a very night grayness might read 50 l 50.
Signal being that they are close to the same value indicating no colour cast is present. In theory, when neutral colours are neutral, other tones will be more than accurate likewise.
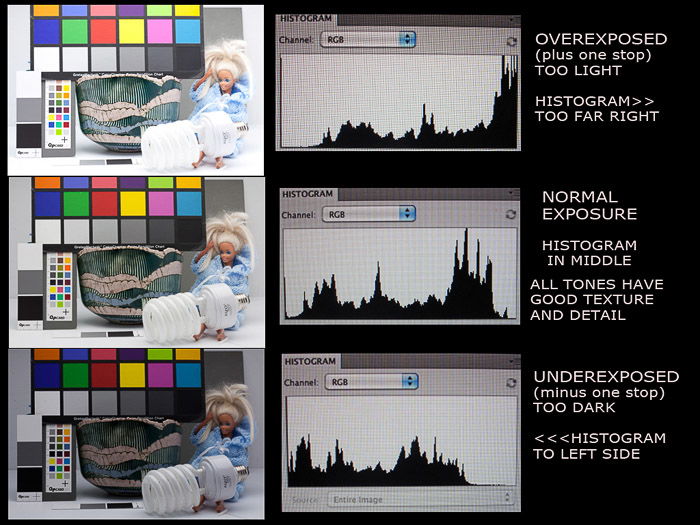
Take a photograph of the entire artwork and bank check that the exposure is right. The best fashion to do this is to use your in-camera histogram. Usually pressing Display in Review mode volition bring information technology up.
The histogram is a brandish of the tonal range in your photograph. It should be roughly centered on a normal toned subject. You tin use the histogram in your image editing program to check exposure and contrast while working.
Check Focus and Shoot Fine Details
Zoom up the photo to 100% on your camera or estimator screen. Bank check the focus at the centre and in all four corners. Check your framing is as square equally possible. You lot tin use the crop or perspective tool for slight adjustments and squaring.
Consider moving in closer for a detailed shot rather than cropping or enlarging the overall picture show. Doing so will give much ameliorate sharpness and showcase the fine details of your work. It is also oftentimes a requirement for entering gallery exhibitions or contests.
Tips for Editing Images of Artwork
Apply an paradigm editing program to crop, remove distortion, retouch, colour correct, and size up your files. Photoshop is the industry standard, and GIMP is the best free editor available. Most paradigm editors similar iPhoto will work with TIFF or JPEG. (For RAW files you will demand to use a RAW converter to procedure.)
Exist sure to archive your original photographic camera files and work on a duplicate. Do all your retouching on this master file at 50 or 100% magnification. When finished, make a copy, so resize this copy to the exact pixel size needed for your usage. Relieve it as a high-quality JPEG.
The JPEG is much smaller due to pinch but still the most accustomed format. Remember to save your image with the appropriate profile, sRGB or Adobe RGB.
Avoid re-saving a JPEG and resetting the quality level more once, every bit this affects sharpness. You may demand to add a trivial sharpening if you have resized the file.
Make sure to check sharpening furnishings at 100% and fifty% and don't overdo information technology. Y'all can e'er add together more than sharpening later, but too much will make the image await jagged.
Conclusion
Well-nigh of u.s.a. accept taken photos of artwork at one signal or some other. If you lot desire to get the best results, make sure y'all follow the steps we showed you.
Photographing artwork is quite uncomplicated, but it relies less on luck and more on techniques yous can replicate from one painting to another.
To capture stunning still life images, bank check out our Creative Photography Cookbook!

Source: https://expertphotography.com/photographing-artwork-tips/
Posted by: carterhinatimsee.blogspot.com
0 Response to "How To Photograph Artwork With Digital Camera"
Post a Comment