

How To Remove Profissional Nikon Camera Strip
Simply like well-nigh bobbies, you'll require certain tools to repair or maintain the equipment that you employ. I dear repairing broken photography equipment, it helps save the planet and I salvage a lot of money forth the way.
I'll outline to you all the essential tools that you need for repairing lenses then that y'all don't waste your time and most importantly, money on gear. Many people will give you the wrong communication on the internet, many from ignorant or arrogant personalities. This has resulted in many people, including me to botch my repairs when I was starting upwardly. I'm neither ignorant nor arrogant, I'g a generous person with experiences to share and so y'all won't finish up being a photographic camera butcher.
Nigh of the tools that you'll need can be bought in regular hardware stores. However, some are specialized and tin only exist bought in specialty stores or online. These are good investments, buy the all-time that yous tin afford only do not get overboard and purchase something that is insanely expensive but of very limited utilize.
Luckily, camera repair has plenty in mutual with watch repair, both deal with precise, small mitt-held tools. Going to the watch repair department of your DIY shop can also exist fruitful. I grew up in a watchmaking family so the tools and skills are all familiar to me.
I highly recommend that you lot follow my advice equally shut as you possibly can because tools like screw drivers seem to be common across the lath simply in reality they come in different types. Using the wrong commuter blazon tin result in a stripped screw head.
I'll never exist held responsible for any broken equipment, tools, gear or your health, please utilize your mutual sense and follow safety procedures.
Screwdrivers and Screws:
These are the most-basic of tools but their essential. Never purchase cheap ones, I fabricated the mistake a long fourth dimension ago and bought cheap-Chinese ones, they are flimsy and may harm your gear! I volition testify you which ones to purchase.

First, you'll demand a gear up of precision screwdrivers. These things are great for smaller screws. Exist certain that yous only go JIS (Japanese Industrial Standard) when repairing Japanese equipment. Hobby shops with a mini 4X4 or radio control section should have these and chances are they volition exist JIS. Japanese brands are also more likely to be JIS (like Tamiya). Never purchase cheap-Chinese precision screwdrivers, you'll use these for a long time, the damage caused by using the wrong screwdriver tin can exist irreversible. If JIS isn't available, get crosspoint drivers. The Philips drivers look similar but are different, never utilize Philips drivers with your Japanese equipment. The all-time make I know is VESSEL, they're not expensive and they're well-fabricated.

You lot will also need precision micro screwdrivers. These micro screwdrivers are essential for screw heads that are too-pocket-sized for regular drivers. E'er remember to "utilise the right tools for the right chore". These are VESSEL-make drivers. You definitely will want to stick to a brand and then I recommend that you stick with VESSEL since they're reliable, inexpensive and of high quality.

For bigger screws, apply regular drivers. Be sure to buy 2 types for each screw type: a long-shafted ones and short shafted ones. The 2 types of screws that you'll come across in camera or lenses are crosspoint and flat. They are likewise chosen plus (+) and minus (-) drivers. Once again, and I can never say this enough: stick with VESSEL. The nigh useful size for plus drivers is 0. The 00 can also be useful from time-to-time only 0 is what I utilize the most. These are used for bigger screws like that ones in the bayonet mountain. The longer ones are used for larger screws that are as well-tight, using the shorter general-purpose ones will but strip the heads even if you lot employ the correct size. The long shaft will give yous the leverage that you demand, a fatter handle will assist give y'all more than torque, likewise. Photographic camera manufacturers dear thread lock (Loctite) a lot and they use this thing copiously. Besides, since the lenses that y'all'll repair will probable be old, the screw might only "fuse" with the thread due to corrosion, grime and other nasty things and extra torque is required. Read my article on working with bayonet screws to know more about how to handle stubborn screws.
If you think that all flat drivers are the same then think once more, the all-time ones have parallel edges, they will not marking the slots because of this. They aren't cheap and then many people grind the usual ones to make them. I don't have time for this and so I spend around $14 for one of these. They're a skilful investment, it is important to buy the all-time ones that yous can afford while making sure the ones that you bought aren't over-priced.

You'll want to search the screws department of your DIY shop for a collection of screws. I'm not familiar with other Japanese brands but the most common sizes that y'all'll find in Nikons and Nikkors should be 2mm (M2) and one.4mm (M1.4), y'all'll occasionally find the odd 1.7mm (M1.7) and other sizes, too. If I didn't arrive obvious, the measurements I merely mentioned pertain to their diameter and not length, and so an M2 screw is 2mm across.
Buy lengths from 2mm to 4mm. The screws found in the bayonet mount are almost likely 2mmX4mm (M2X4). The smaller ones used in the lens are either 1.4mmX2mm (M1.4X2) or the 1.4mmX3mm (M1.4X3). There'll exist rare cases when you'll meet the odd 1.7mm (M1.vii) screws, these screws are used internally in parts where extra-strength is required like in the helicoid keys or to mount the optical assemblies.
Another of import thing to take note is to but buy flat head screws with a very low head since yous don't want the heads to protrude in most cases.
Set screws (grub screws) are those tiny screws that don't have a flared caput. They're special and should be handled with care. They're as well very brittle as they can intermission under stress. These cannot exist bought easily and can only be bought from special manufacturers.
Specialized Tools:
Repairing cameras or lenses require special tools simply like how watch repair requires special gadgets. Most can be made from fleck metallic, some volition toll you a flake because they're specialized and the marketplace for them is small. Don't purchase the cheap-Chinese ones from the internet, they have flooded the market place recently and they volition exercise more impairment than proficient.

The workman'south compass is used by other trades such as leather-working or engineering. Skilful ones are expensive, I buy the German ones as they're the all-time. Be sure to buy very proficient ones, cheap ones may slip and cause damage. Brand sure that the ones you'll purchase isn't going to slip and has a good tension locking screw. They're used to twist open up retainers. Anything that has holes or slots at opposite ends bespeak that this tool is needed to open information technology. I usually alter these past bending the tips in-or-out to fit sure tasks. The time may also be rounded with a file to prevent damage. I own several of these, some are long while some are short.

The lens opener or lens spanner is seldom used but is so essential that yous volition want to purchase a good set. The workman's compass has the same general function simply at that place will be times when a lens opener is the right tool for a job. The inexpensive ones can be scary since the locking screws holding the points can be flimsy. If the role that yous need to access is inside the barrel or is too narrow for this tool then the workman's compass is the right tool, not this. I see many cheap-Chinese ones, they're flimsy and they bend. Avoid them, get the all-time ones that yous tin can buy like the 1 you run across here. If not, make sure it has a rectangular cross-bar and not circular ones. The circular ones will not concur their shape when y'all curve them and will skew under pressure level.

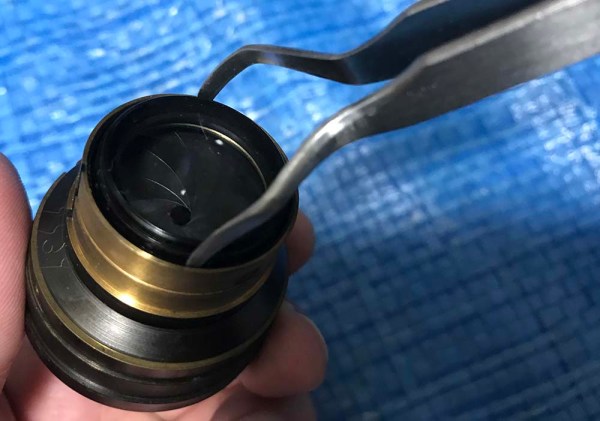
These are called friction wrenches. These are basically just condom stoppers that come up in different diameters with a hollow core. These are used to twist open up the metal or plastic front rings holding the front element with friction and torque. While I got these as a set and I strongly recommend that you practice the aforementioned, yous can also way some yourself past using the rubber stoppers that hardware stores sell to put on the feet or bases of chairs or metallic pipes. Simply brand sure that the centre part volition never touch anything.

This is a lens sucker. It sucks the glass while you remove or place them into their housings. Some elements that are positioned besides-deep into the barrel like the case of longer lenses volition crave these to admission and put them back. Brand sure that the rubber part that come in contact with the glass is e'er clean. This is likewise a mutual watch repair tool to hold the crystal.

Purchase the best blower that you tin afford, you'll desire a stiff burst of air to clean any fibers from the surface of your lens or to remove junk and $.25 of metal from whatever that yous are milling.

This is a pipe-key. It's used to plow rings that have slots in them, they're the best tool for the job but it tin can be difficult to source pipes with the right size. I normally factory these peculiarly for expensive equipment where I don't desire to leave any marks. It's important that you make one from brass or any metal that'due south strong-enough but isn't too-hard as to mar the surface of your gear. It is a highly-specialized tool and is commonly only used for a sure part of the equipment you're repairing, information technology usually tin can't be used with other things.
This is an culling to a pipage-key. This can be easily made and can be used again with anything and then long every bit they will fit. Read this article on how to make a pipage key alternative to begin making one.

A lens vise is used to repair a dented filter ring. Read this article on how to use a lens vise to see how dented front end rings are repaired. Alternatively, you tin can modify a pair of pliers and weld several sections of pipes to achieve the aforementioned effect but that's a chip more than risky. I also apply a male-female wooden die and whack the cleaved part with a mallet to bring the dent dorsum-to-shape.

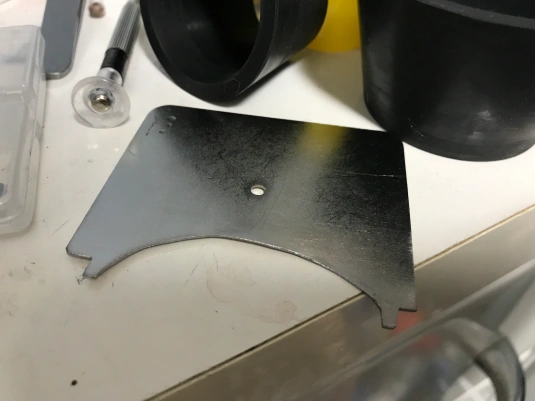
This is DIY lens spanner. Information technology is easily fabricated using chip materials and tin exist handy if you lot need remove a retainer band seated deep-inside something and is out-of-attain using a compass or you don't want to scratch anything inside by using a metallic tool. Read more about this tool here in this article on how to make a DIY lens spanner!
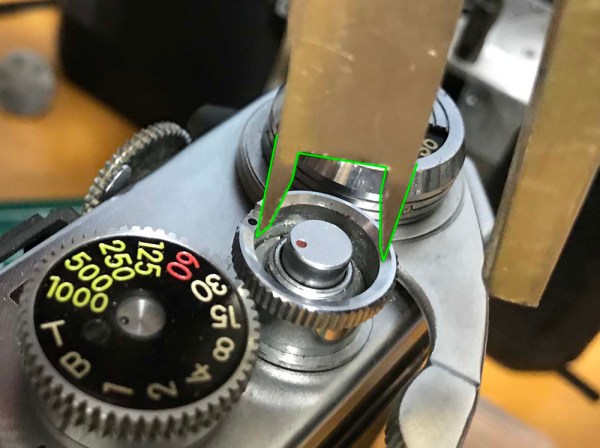
This tool is very important for those who wish to repair earlier Nikons. This A/R ring opener is needed to remove the lock for the shutter push button guard. I made an article on how to create and use an A/R ring opener.

Only purchase grease that'south made particularly for lenses, using the wrong blazon volition result in the grease migrating to parts of the lens that don't need it and may stiffen or run on extreme temperatures. I utilize two types of grease, ane for general use like this S10 grease and another one that's a bit thicker if I want the helicoids to be stiffer. I consider this S10 grease to exist a general-purpose grease so I use this for the majority of my lenses.

Always remember that you lot should never always mix grease of unlike types together as this will alter the chemical science of the grease. You'll need to make clean any surface from the old grease and other impurities before you apply your new grease. The photographic camera manufacturers utilize unlike kinds of lubricants for dissimilar parts of the lens merely I use the aforementioned blazon of grease that I applied to the helicoids as my full general lubricant so that there volition never be a run a risk of anything else mixing with the helicoid grease. Retrieve never to utilize besides much grease or your lens volition be oily again in no-fourth dimension. Another rule I follow is to lubricate anything that has metal-to-metal contact and move regularly like the aperture ring, springs, bushings and helicoid keys.
You lot'll just need shutter testers when you desire to repair cameras. Be sure to buy ones that has at to the lowest degree two sensors at each border of the frame, one for the opening curtain and some other for the closing curtain. Those with i single sensor is only good for lens-shutters or leaf shutters. The 1 you run into in my video merely has a single sensor, I use another ane with multiple sensors and I cannot recommend the ones like y'all encounter in my video. Never ever buy those testers that base their readings on audio, they're mostly a waste of money. If anybody told you that they tin gauge a shutter'south timing by-ear, they must be loftier with something. That's BS, I want to know what piping they're smoking.
These are the more-common tools that I apply for camera and lens repair. It's important to use the right tool for the chore to prevent whatever accidents. Your collection of specialized tools will grow equally you get more involved with this hobby.
Other Tools:
Hither are some more than equipment that will be useful for your hobby. They are important and you can source them from just about anywhere.

Lens tissue is valuable for cleaning a lot of things. Remember never to use the same tissue that you used to wipe metal surfaces to wipe anything that is drinking glass. Another is to never wipe your glass using a dry tissue. While these are soft, they may be abrasive enough if dry out. Also blow it with your blower before wiping. Lens tissue is lint-gratuitous, you lot tin can as well utilise a soft rag, the same ones used for wiping lenses just those aren't dispensable.

You will need several types of tweezers and you will as well want to purchase ones that aren't made of metal. I have several pairs of plastic ones, the good ones aren't cheap only they're perfect for handling delicate parts such every bit the iris.

You lot'll need several types of solvents, both polar and non-polar ones. This is a very controversial topic considering some people don't like the idea of using a petrol-based solvent naphtha. I utilize them considering some stuff volition only react to a non-polar agent. Just be careful and y'all should be OK. Alcohol is really proficient for cleaning things and I accept a vat filled with alcohol so I can soak a part that's dingy to disinfect it. Be conscientious when handling these, you should never use these with delicate parts such as cemented groups. Always have adequate ventilation when using solvents or you'll become loftier.

Acetone is invaluable as a solvent, what you lot see here is definitely also much for hobby-apply just it'south industrial-grade and I cannot find a smaller container.
Shellac is bang-up for use as adhesive when bonding leatherette and other soft materials like material or felt. I also employ it equally a sealant and securing parts such as screws. It'due south inexpensive compared to Loctite merely it isn't every bit potent. One way to thicken information technology is to burn down a small-scale amount of it in a metallic container or just allow the solvent evaporate for some fourth dimension. You lot can also utilize several coats if you need the shellac to be thin-enough to be brushed to a surface to ensure an even-glaze. Old cameras utilize this to bond curtains to the shutter, information technology's tough so long as you know how to utilise this properly. Like contact cement it is best practical to both sides and cured for a brusk fourth dimension until sticky before application.

A Dremel and its stand (Dremel Workstation) is handy if you need to drill or grind things. I use it as my grinder when I demand to mill new parts or alter existing parts. Sometimes, you'll need to apply this to drill a hole in a stripped screw's head and use a screw extractor to safely remove a stripped screw. It is worth mentioning that you lot'll demand special bits for unlike jobs.

You will likewise need generic tin containers to put your cleaning fluids or just to organize parts so that they practice non get lost.

This is a micro spiral-extractor for removing stripped screws. Only purchase the blazon that has a grooved signal that bites-into the hole drilled into a stripped screw. Never ever purchase whatever gimmicky screw-extractors such every bit Moody Tools' screw extractors, they're expensive and useless. Simply buy the ones that look and part the same as the one in the picture to a higher place. This is important.
Here are the other tools that I utilise:
Drill bits for drilling or for using with paw taps and the screw extractors.
Manus taps for fixing worn threads or for making new screw holes.
Denatured alcohol for bathing or dipping your metal or plastic parts prior to terminal wiping to remove lighter fluid remainder, lacquer, oil and grime.
Nail polish remover/Acetone is of import for softening the seals that the Japanese manufacturers apply.
Q-tips for obvious reasons.
Hydrogen Peroxide & Ammonia for killing mucus. Mix in equal parts. Y'all can likewise add together a potent vinegar to make it more strong. Read my post on how to remove fungus from your lens to discover out more about this.
Cerium Oxide for polishing scratched glass surfaces.
Lens material for doing the concluding wiping of the glass before reinstalling them.
LED lamp to inspect if you left any fibers in the glass and also to illuminate your piece of work surface area.
Files and sandpaper for parts modifications and fabrication.
Safety gloves to help yous grip things and protect your hands.
Rubber mallet, because sometimes some things merely need a practiced whack!
Rubber canteen opener, they await similar oil filter wrenches but made of some kind of difficult rubber. They're great for unscrewing stubborn lens barrels.
Multi-meter to diagnose electronics.
Hobby knife for cutting things.
Contact cement for gluing leatherette and rubber parts.
Smash polish for securing parts. Lacquer paint is as well great for this.
Micro-meter for precise measurements.
That's all that I can think for now. There are more than things that I use but they aren't what I would call essential. To be honest, most of the things that you see listed here are optional and are merely used for certain situations. Y'all're not going to be needing most of them every time merely it'southward good to have them handy just-in-case.
Decision:
These are just some of the things that I commonly utilise for repairing broken lenses and cameras. If you've been repairing things then chances are you're already familiar with many of the things that I listed or yous may have them in your kit now every bit you read this. If you don't, just buy or brand them as yous movement-forrard into this hobby and you'll acquire a collection of tools in no time. Ric.
Help Back up this Blog:
Maintaining this web log requires money to operate. If y'all call back that this site has helped you or you want to testify your support past helping with the site'south upkeep, you lot tin can brand asmall donation to mypaypal.com (richardHaw888@gmail.com). Money is not my prime motivation for this blog and I believe that I take enough to run this just you can help me make this site (and the companionfacebook folio) grow.
Buy me a roll of film or a burger?
Give thanks y'all very much for your continued support!
$two.00
Helping support this site volition ensure that this volition be kept going equally long as I have the time and energy for this. I would capeesh it if you just go out out your name or details similar your country's name or other information so that the donations volition totally be anonymous. This is a labor of love and I intend to continue it that fashion for as long as I tin can. Ric.
Source: https://richardhaw.com/2015/12/23/camera-and-lens-repair-essentials/
Posted by: carterhinatimsee.blogspot.com
0 Response to "How To Remove Profissional Nikon Camera Strip"
Post a Comment